How to Make Your Cosplay
Now that you have your idea and materials, here comes the big part: make your cosplay! It’s now time to put all the pieces together to assemble your cosplay! Here you will find some more techniques and tricks to assemble your cosplay for your upcoming con, Halloween, or prank on your neighbors (lol).
Your Size Fits All
For a perfect super–hero (or super villain) fit to make your cosplay, you’ll need to get some accurate measurements/proportions. You can start by using some flexible measurement tape to measure your bust, arms and waist for accurate proportions . Or for a very accurate measurement, you can create a mannequin of yourself! But how? All you need is a couple rolls of duct tape, and old long sleeve shirt and pants, some scissors, and a buddy. You can find more specific details on how this process works on Instructables.com. (Great site for specific cosplay examples.)
Making a mask, helmet, or crown but want it to fit perfectly? Use a piece of wire to wrap around your brow to the back and then twist it together. Add another piece to run across the top of your head to connect to the back and connect it to the brow wire. Add some more wires to reinforce it and you’ll have a wire dome! You’ll use it as a basis for any headwear you can think of to make your cosplay headpiece! You can also use the flexible measuring tape to measure around your neck to fit a collar or neckpiece.
Fabric Cosplays

So you have a character that has a cool fabric design or clothing-based design? Luckily the clothing/pieces you’ve found from the stores/ online will come in handy! Learning how to sew by hand will help a lot and having access to a sewing machine would be even better! But fear not, if you don’t want to learn how to sew nor have access to a sewing machine that’s totally fine to make your cosplay! If you’ve found a pattern/design that’s right for you, you can put them together using hot a glue gun and special fabric hot glue guns! But for saving some possible hassle, I would test that the glue sticks on a piece of scrap fabric before moving on to the actual cosplay. Or you maybe won’t need to glue or sew them together at all. Just put them together on your mannequin and test how it looks!
3D & Armored Cosplay
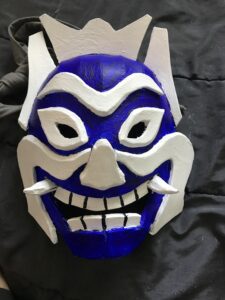
EVA foam is going to be your main ingredient for making these kinds of builds. This stuff can pretty much make any kind of armor or three-dimensional objects for your cosplay. And the best part? It’s pretty darn cheap and durable, making it one of the best materials recommended at Cost Effective Cosplay! The other things you’ll need are a box knife, contact cement/hot glue, a hair dryer/heat gun, some PVA glue, and flexible acrylic paint. IMPORTANT: I would test this whole process on a scrap piece of foam or small build before moving on to your actual cosplay piece!
Step 1: Templates & Tracing
Next, you’ll need a template for your foam cosplay build. These are the puzzle pieces printed on paper so you can trace them onto the foam sheet. You can find many templates for free on a multitude of sites for dozens of cosplay ideas by just Googling them such as “sci-fi helmet cosplay templates”. Once you have those printed out, cut them out with scissors and trace them onto the foam sheet. I would use some sewing pins to hold the templates in place on the foam so you can trace over them more easily.
Step 2: Cutting, Gluing & Sealing.
Next, cut them out the traced template pieces with your box knife using good precision. Make sure to look at reference images of your desired build. This is so whether or not you’ll need to cut them at an angle to help with the 3D form. Then glue the matching pieces together using either hot glue or contact cement. (Hint: Contact cement has a stronger hold but requires a lot more precision.) Next you can use your hair dryer or heat gun to seal the foam. This will make the surface more shiny and smooth. Or you can leave it out in the sun for a while. But, I wouldn’t recommend doing that if you used hot glue. The glue will melt!
Step 3: Priming & Painting
Once your piece is heat sealed, you can prime it with a few layers of PVA glue. This will make the paint stick to it. Then use some medium-large rectangular soft brushes to apply a couple layers of the paint. Alternatively, you could use rubber adhesive spray to seal it and acrylic spray paint, but you would need an outdoor space for proper ventilation. If using multiple colors, use some masking tape to cover the parts you’re not painting. Then, KABOOM! Your cosplay piece is done!